Following on from our Build WAX Hyperion Software Components article, this next sub-article in the series will walk through the configuration of each of these components.
EOS RIO have an excellent Hyperion Documentation Repository including details on how to configure all Hyperion Software Components, however in this article the manual configuration process for Hyperion using Elasticsearch 8.x and associated software components will be covered.
Once again this Technical How To series will cover some of EOS RIO’s same content and will add operational nuances from a practical stand point and our experience.
Learn more about EOS RIO Hyperion

This article has been updated to reflect the current Hyperion deployment in September 2023.
Configure WAX Hyperion Software Components
The Hyperion Full History service is a collection of eight purpose built EOS RIO software and industry standard applications.
This configuration walk through example has all software components excluding the SHIP node installed on a single Ubuntu 22.04 server as per "Build WAX Hyperion Software Components". This example server is also equipped with 16GB of RAM and a modern 8 Core 4Ghz CPU, suitable for running Full History on the WAX Testnet. It is also recommend to disable system Swap space.
Please reference "Introduction to WAX Hyperion Full History" for infrastructure suggestions especially when considering providing the service on WAX Mainnet.
The configuration process for each of these primary building blocks is covered below:
WAX Software State-History (SHIP) Node
The WAX Hyperion deployment requires access to a fully sync’d WAX State-History Node. This configuration process is extensively covered in WAX Technical How To #7.
RabbitMQ
Follow the configuration process below:
#Enable the Web User Interface
> sudo rabbitmq-plugins enable rabbitmq_management

#Add Hyperion as a Virtual Host
> sudo rabbitmqctl add_vhost hyperion

#Create a USER and PASSWORD (Supplement with your own)
> sudo rabbitmqctl add_user <USER> <PASSWORD>

#Set your USER as Administrator
> sudo rabbitmqctl set_user_tags <USER> administrator

#Set your USER permissions to the Virtual Host
> sudo rabbitmqctl set_permissions -p hyperion <USER> ".*" ".*" ".*"
Check access to the Web User Interface using a browser:
http://<SERVER IP ADDRESS>:15672Redis
Redis version 7.x has a tricky default memory policy of use all available memory with no eviction meaning it will use all available memory until in runs out and crashes.
To handle this challenge it is important to set the memory policy to allkeys-lru (Keeps most recently used keys; removes least recently used keys). We have been assigning 25% of the Hyperion Node’s memory to Redis with good results.
Configure as below:
> sudo nano /etc/redis/redis.conf

###GENERAL###
daemonize yes
supervised systemd

###MEMORY MANAGEMENT###
maxmemory 4gb
maxmemory-policy allkeys-lru

> sudo systemctl restart redis-server

> sudo systemctl enable redis-server
To view Redis memory config and statistics:
> redis-cli
-> info memory
Debug Redis issues in the logs:
> sudo tail -f /var/log/redis/redis-server.logNode.js
Nothing to configure here, however ensure you are running Node.js v16
> node -v
v18.x.x
PM2
Nothing to configure here, check that you are running the latest PM2 version5.3.0
> pm2 --version
5.3.0
Elasticsearch
Configure Elasticsearch 8.x as below:
> sudo nano /etc/elasticsearch/elasticsearch.yml

cluster.name: <YOUR CLUSTER NAME>
node.name: <YOUR NODE NAME>
bootstrap.memory_lock: true
network.host: <LAN IP Address>
cluster.initial_master_nodes: ["<LAN IP ADDRESS>"]
Additional to the above configuration it can also be advantageous to change the Elasticsearch disk usage watermark (80% is default high) and the maximum number of shards per node (1000 is the default shard maximum) depending on your deployment.
> sudo nano /etc/elasticsearch/elasticsearch.yml

cluster.routing.allocation.disk.threshold_enabled: true
cluster.routing.allocation.disk.watermark.low: 93%
cluster.routing.allocation.disk.watermark.high: 95%

cluster.max_shards_per_node: 3000
Configure Java Virtual Machine settings as below, don’t exceed the OOP threshold of 31GB, this example will use 8GB suitable for Hyperion on the WAX Testnet and 50% of the servers memory:
> sudo nano /etc/elasticsearch/jvm.options

-Xms8g
-Xmx8g
Allow the Elasticsearch service to lock the required jvm memory on the server
> sudo systemctl edit elasticsearch

[Service]
LimitMEMLOCK=infinity
Systemctrl configuration below:
#Reload Units
> sudo systemctl daemon-reload

#Start Elasticsearch
> sudo systemctl start elasticsearch.service

#Start Elasticsearch automatically on boot
> sudo systemctl enable elasticsearch.service
Check that Elasticsearch is running:
> sudo systemctl status elasticsearch.serviceDebug Elasticsearch issues in the logs:
> sudo tail -f /var/log/elasticsearch/gc.log

> sudo tail -f /var/log/elasticsearch/<YOUR CLUSTER NAME>.log
Test the Rest API which by default will require access to the Elasticsearch cluster certificate and run as root for access to the cert:
> sudo su -

root@>  curl --cacert /etc/elasticsearch/certs/http_ca.crt -u elastic https://<LAN IP Address>:9200

**Enter "elastic" superuser password***
Enter host password for user 'elastic':
{
  "name" : "<YOUR NODE NAME>",
  "cluster_name" : "<YOUR CLUSTER NAME>",
  "cluster_uuid" : "exucKwVpRJubHGq5Jwu1_Q",
  "version" : {
    "number" : "8.10.1",
    "build_flavor" : "default",
    "build_type" : "deb",
    "build_hash" : "a94744f97522b2b7ee8b5dc13be7ee11082b8d6b",
    "build_date" : "2023-09-14T20:16:27.027355296Z",
    "build_snapshot" : false,
    "lucene_version" : "9.7.0",
    "minimum_wire_compatibility_version" : "7.17.0",
    "minimum_index_compatibility_version" : "7.0.0"
  },
  "tagline" : "You Know, for Search"
}
Kibana
Elasticsearch 8.x brings a few efficiencies in regards to connecting additional nodes and stack services such as Kibana by automatically using certificates. This is great of course, however the Hyperion Indexer and API don’t have a mechanism at the moment to utilise a certificate to connect to the Elasticsearch REST API and this function appears to be bound to SSL.
Your results may vary, but it has been my experience that the surest way to ensure the Hyperion software is able to connect to Elasticsearch 8.x without a certificate is to disable encryption for HTTP API client connections. As all this inter-node communication happens privately in your DC it shouldn’t be an issue.
UPDATE: Utilising a fresh install of the latest Elasticsearch I was able to connect Hyperion with encrypted SSL (HTTPS) leaving the normal auto-magic certificate config working fine with Kibana. I will leave both options in this guide to be complete.
Configure Kibana as below:
> sudo nano /etc/kibana/kibana.yml

server.host: "0.0.0.0"
Systemctrl configuration below:
#Reload Units
> sudo systemctl daemon-reload#Start Kibana

> sudo systemctl start kibana#Start Kibana automatically on boot

> sudo systemctl enable kibana.service
Check that Kibana is running:
> sudo systemctl status kibana.serviceBelow I will demonstrate both ways to connect Kibana to Elasticsearch 8.x , using the auto-magic certificate method and then by using a non-encrypted local password method.
When xpack encryption for HTTP is disabled, it then becomes necessary to set a password for Kibana on the Elasticsearch server as it won’t be using a cert.
Certificate Method:
Generate and copy an enrolment token on the Elasticsearch Server to be used for Kibana:
> sudo /usr/share/elasticsearch/bin/elasticsearch-create-enrollment-token -s kibanaConnect to the Kibana Web User Interface using a browser and paste the access token:
http://<SERVER IP ADDRESS>:5601/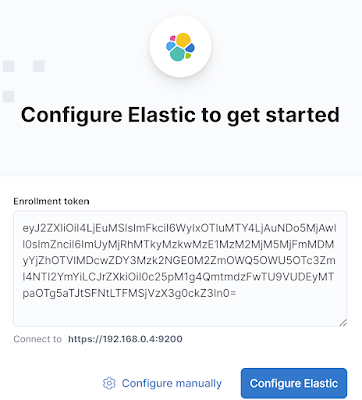
Enter Kibana Enrollment Token
Obtain the Kibana verification code from the Kibana server command line and enter in the Kibana GUI:
> sudo /usr/share/kibana/bin/kibana-verification-code
Your verification code is:  XXX XXX
Kibana is now connected to Elasticsearch, you are able to log in with username “elastic” and the elastic “superuser” password.
Password Method:
The kibana_system account will need to be enabled with a password in Elasticsearch, copy the password output:
> sudo su - root@> /usr/share/elasticsearch/bin/elasticsearch-reset-password -u kibana_systemThen add the credentials + host details to the Kibana config and if necessary HASH# out the SSL automatically generated config at the bottom of the .yml file:
> sudo nano /etc/kibana/kibana.yml

elasticsearch.hosts: ["http://<SERVER IP ADDRESS>:9200"]

elasticsearch.username: "kibana_system"
elasticsearch.password: "<PASSWORD>"
Disable xpack security for HTTP API Clients in Elasticsearch:
#Enable encryption for HTTP API client connections, such as Kibana, Logstash, and Agents

xpack.security.http.ssl:
  enabled: false
Finally restart Elasticsearch and Kibana:
> sudo systemctl restart elasticsearch.service

> sudo systemctl restart kibana.service
Debug Kibana issues in the system logs:
> tail -f /var/log/syslogIdeally it would be best if certificates could be used for all REST API access, I will update this article when I’m aware of a suitable solution.
EOS RIO Hyperion Indexer and API
There are two .json files necessary to run the Hyperion Indexer and API. connections.json and .config.json
connections.json
The below example connections.json is configured for WAX Testnet, amend the config and network for your own deployment. This config is using a user and password to connect Elasticsearch with HTTP.
> cd ~/hyperion-history-api

> cp example-connections.json connections.json

> sudo nano connections.json

{
  "amqp": {
    "host": "127.0.0.1:5672",
    "api": "127.0.0.1:15672",
    "protocol": "http",
    "user": "<Rabbitmq USER>",
    "pass": "<Rabbitmq PASSWORD>",
    "vhost": "hyperion",
    "frameMax": "0x10000"
  },
  "elasticsearch": {
    "protocol": "http",
    "host": "<SERVER IP ADDRESS>:9200",
    "ingest_nodes": [
      "<SERVER IP ADDRESS>:9200"
    ],
    "user": "elastic",
    "pass": "<superuser password>"
  },
  "redis": {
    "host": "127.0.0.1",
    "port": "6379"
  },
  "chains": {
    "wax": {
      "name": "WAX Testnet",
      "chain_id": "f16b1833c747c43682f4386fca9cbb327929334a762755ebec17f6f23c9b8a12",
      "http": "http://<NODEOS API IP ADDRESS>:8888",
      "ship": "ws://<NODEOS SHIP IP ADDRESS>:8080",
      "WS_ROUTER_HOST": "127.0.0.1",
      "WS_ROUTER_PORT": 7001,
      "control_port": 7002
    }
  }
}
.config.json
The .config.json file is named to reflect the chains name in this case wax.config.json. The configuration as before needs to be adjusted to suit your own config and deployment using the provided example as a base.
There are three phases when starting a new Hyperion Indexer, the first phase is what is called the “ABI Scan” which is the default mode in the software provided example.config.json.
The below config (an EOSphere server) will prepare this example to be ready to run the ABI Scan phase of Indexing which will be covered in the next article.
Configure as below, take note of the #UPDATE# parameters
> cd ~/hyperion-history-api/chains

> cp example.config.json wax.config.json

> nano wax.config.json

{
  "api": {
    "enabled": true,
    "pm2_scaling": 1,
    "node_max_old_space_size": 1024,
    "chain_name": "WAX Testnet", #UPDATE#
    "server_addr": "<IP ADDRESS FOR SERVER API>", #UPDATE#
    "server_port": 7000,
    "stream_port": 1234,
    "stream_scroll_limit": -1,
    "stream_scroll_batch": 500,
    "server_name": "<YOUR PUBLIC SERVER URL>", #UPDATE#
    "provider_name": "<YOUR GUILD NAME>", #UPDATE#
    "provider_url": "<YOUR ORG URL>", #UPDATE#
    "chain_api": "",
    "push_api": "",
    "chain_logo_url": "<CHAIN LOGO.jpg URL>", #UPDATE#
    "enable_caching": false, #DISABLED FOR BULK INDEXING#
    "cache_life": 1,
    "limits": {
      "get_actions": 1000,
      "get_voters": 100,
      "get_links": 1000,
      "get_deltas": 1000,
      "get_trx_actions": 200
    },
    "access_log": false,
    "chain_api_error_log": false,
    "custom_core_token": "",
    "enable_export_action": false,
    "disable_rate_limit": false,
    "rate_limit_rpm": 1000,
    "rate_limit_allow": [],
    "disable_tx_cache": true, #DISABLED FOR BULK INDEXING#
    "tx_cache_expiration_sec": 3600,
    "v1_chain_cache": [
      {
        "path": "get_block",
        "ttl": 3000
      },
      {
        "path": "get_info",
        "ttl": 500
      }
    ]
  },
  "indexer": {
    "enabled": true,
    "node_max_old_space_size": 4096,
    "start_on": 0,
    "stop_on": 0,
    "rewrite": false,
    "purge_queues": false,
    "live_reader": false, #DISABLED FOR BULK INDEXING#
    "live_only_mode": false,
    "abi_scan_mode": true, #SET TO ABI_SCAN_MODE#
    "fetch_block": true,
    "fetch_traces": true,
    "disable_reading": false,
    "disable_indexing": false,
    "process_deltas": true,
    "disable_delta_rm": true
  },
  "settings": {
    "preview": false,
    "chain": "wax", #SET CHAINS ID#
    "eosio_alias": "eosio",
    "parser": "3.2", #SET TO 1.8 for < 3.1 SHIP#
    "auto_stop": 0,
    "index_version": "v1",
    "debug": false,
    "bp_logs": false,
    "bp_monitoring": false,
    "ipc_debug_rate": 60000,
    "allow_custom_abi": false,
    "rate_monitoring": true,
    "max_ws_payload_mb": 256,
    "ds_profiling": false,
    "auto_mode_switch": false,
    "hot_warm_policy": false,
    "custom_policy": "",
    "index_partition_size": 10000000,
    "es_replicas": 0
  },
  "blacklists": {
    "actions": [],
    "deltas": []
  },
  "whitelists": {
    "actions": [],
    "deltas": [],
    "max_depth": 10,
    "root_only": false
  },
  "scaling": {
    "readers": 2, #INCREASE READERS#
    "ds_queues": 1,
    "ds_threads": 1,
    "ds_pool_size": 1,
    "indexing_queues": 1,
    "ad_idx_queues": 1,
    "dyn_idx_queues": 1,
    "max_autoscale": 4,
    "batch_size": 5000,
    "resume_trigger": 5000,
    "auto_scale_trigger": 20000,
    "block_queue_limit": 10000,
    "max_queue_limit": 100000,
    "routing_mode": "round_robin",
    "polling_interval": 10000
  },
  "features": {
    "streaming": {
      "enable": false,
      "traces": false,
      "deltas": false
    },
    "tables": {
      "proposals": true,
      "accounts": true,
      "voters": true
    },
    "index_deltas": true,
    "index_transfer_memo": true
    "index_all_deltas": true,
    "deferred_trx": false,
    "failed_trx": false,
    "resource_limits": false,
    "resource_usage": false
  },
  "prefetch": {
    "read": 50,
    "block": 100,
    "index": 500
  },
  "plugins": {}
}
All configuration is now ready to move onto running the Hyperion Indexer and API for the first time, this will be covered in the next WAX Hyperion Full History sub article.
These WAX Developer Technical Guides are created using source material from the EOSphere WAX Technical How To Series
Be sure to ask any questions in the EOSphere Telegram