Our previous guides have focused primarily on building and running WAX Software, but that is only part of the picture when providing reliable services to the WAX Ecosystem.
This guide will walk you through the process of building and running a Load Balancer service to reliably scale to WAX’s security and performance demands.
How to Set Up a Reliable WAX Load Balancer
Scaling your WAX Protocol Network API services to millions of requests per day can be a challenge if you hadn’t planned ahead for the load and availability requirements of providing Guild level service delivery.
Implementing Load Balancers at the public facing side of your infrastructure are a fantastic way to reliably scale your API service offering.
A Load Balancer is primarily implemented for the following benefits:
- To balance user requests across multiple backend servers
- Offloads SSL handshake and encryption/decryption
- Decreases the burden of backend servers having to manage application and network user sessions
- Creates a security demarcation point for your WAX service offering to users out on the internet
EOSphere have had tremendous success utilising HAProxy software to serve our Load Balancer requirements.
HAProxy is a free, very fast and reliable solution offering high availability, load balancing, and proxying for TCP and HTTP-based applications. It is particularly suited for very high traffic web sites and powers quite a number of the world’s most visited ones. Over the years it has become the de-facto standard opensource load balancer, is now shipped with most mainstream Linux distributions, and is often deployed by default in cloud platforms
This guide will provide an example of how to build and configure HAProxy for use on the WAX Protocol Network based on our own experience and recommendations.
Requirements
**Hardware (Running is a virtual environment works great)
**Note: Depending on what traffic you receive you may need to scale up as required
- 2 Core+ CPU
- 32GB+ Disk
- 1GB+ RAM
- Public Network Interface
- Private Network Interface
Operating System
- Ubuntu 18.04
- Ubuntu 20.04 (Recommended)
- Linux 2.4 on x86, x86_64, Alpha, Sparc, MIPS, PARISC
- Linux 2.6–5.x on x86, x86_64, ARM, AARCH64, MIPS, Sparc, PPC64
- Solaris 8/9 on UltraSPARC 2 and 3
- Solaris 10 on Opteron and UltraSPARC
- FreeBSD 4.10 — current on x86
- OpenBSD 3.1 to -current on i386, amd64, macppc, alpha, sparc64 and VAX (check the ports)
- AIX 5.1–5.3 on Power™ architecture
Internet
- Modern Broadband / Fibre Connection (100Mb/s synchronous and above)
- Static Public IP Address (Either terminating on this node or forwarded with NAT)
- Domain Name and DNS Provider
- SSL Certificate
Install the Software
In this example we will be installing HAProxy from a community edition recommended Personal Package Archive (PPA) maintained by Vincent Berant and using the latest as of October 2022 HAProxy LTS branch v2.6.0 (Supported until Q2 2027)
This build has native support for Prometheus allowing you to view and export metrics and enables cool observability as well as logging and tracing.
Installation Process
Use the below process to install HAProxy v2.6.0:
> sudo apt install --no-install-recommends software-properties-common

> sudo add-apt-repository ppa:vbernat/haproxy-2.6

> sudo apt update> apt install haproxy=2.6.\*
You can check the installed version as below, make sure you can see Prometheus support:
> haproxy -vv

Built with the Prometheus exporter as a service
Configuration
Now that you have a fresh HAProxy install let’s configure the instance for production. In this example the goal is to:
- Load Balance incoming requests to two WAX API
nodeosservers - Offload SSL encryption/decryption of the HTTPS sessions
- Observe HAProxy metrics utilising the Prometheus service
This example has a public internet interface which is client facing as well as a separate private LAN interface where the servers are hosted.
All HAProxy configuration is found in haproxy.cfg The configuration is divided into 4 sections.
global
# global settings go here

defaults
# defaults go here

frontend
# the frontend accepts requests from clients

backend
# servers to fulfill client request go here
There is a default haproxy.cfg that you can make a copy of for future reference:
> sudo mv /etc/haproxy/haproxy.cfg /etc/haproxy/old_haproxy.cfgFollow the below to configure each section in the new haproxy.cfg :
> sudo nano /etc/haproxy/haproxy.cfgglobal
global
        log /dev/log    local0
        log /dev/log    local1 notice
        maxconn 100000
        chroot /var/lib/haproxy
        stats socket /run/haproxy/admin.sock mode 660 level admin expose-fd listeners
        stats timeout 30s
        tune.ssl.default-dh-param 2048
        user haproxy
        group haproxy
        daemon

        # Default SSL material locations
        ca-base /etc/ssl/certs
        crt-base /etc/ssl/private

        # Default ciphers to use on SSL-enabled listening sockets.
        ssl-default-bind-ciphers ECDH+AESGCM:DH+AESGCM:ECDH+AES256:DH+AES256:ECDH+AES128:DH+AES:RSA+AESGCM:RSA+AES:!aNULL:!MD5:!DSS
        ssl-default-bind-options no-sslv3 no-tlsv10 no-tlsv11
defaults
defaults
        log     global
        mode    http
        http-reuse always
        option  httplog
        option  dontlognull
        timeout connect 10000
        timeout client  25000
        timeout server  25000
        errorfile 400 /etc/haproxy/errors/400.http
        errorfile 403 /etc/haproxy/errors/403.http
        errorfile 408 /etc/haproxy/errors/408.http
        errorfile 500 /etc/haproxy/errors/500.http
        errorfile 502 /etc/haproxy/errors/502.http
        errorfile 503 /etc/haproxy/errors/503.http
        errorfile 504 /etc/haproxy/errors/504.http
frontend
In this section you will be enabling your public internet interface to accept incoming client requests, you will also be binding your SSL Certificate to be able to accept HTTPS and provide SSL Offloading.
frontend http-in
    bind <PUBLIC IP ADDRESS>:80
    bind <PUBLIC IP ADDRESS>:443 ssl crt /etc/ssl/certs/eosphere-local-cert-key-2021.pem alpn h2,http/1.1
    http-response set-header Access-Control-Allow-Origin "*"
    http-response set-header Access-Control-Allow-Headers "Origin, X-Requested-With, Content-Type, Accept, Authorization, JSNLog-RequestId, activityId, applicationId, applicationUserId, channelId, senderId, sessionId"
EOSphere use Comodo provided wildcard SSL certificates, your results may vary but the construct of the eosphere-local-cert-key-2021.pem in this example is the following and in the order below:
your_company.key

your_company.crt

SectigoRSADomainValidationSecureServerCA.crt

USERTrustRSAAAACA.crt
Copy and past the text in the above files into the new single file and save this created file to /etc/ssl/certs/<yourcompany_key>.pem
In addition to a typical frontend configuration this example will use an access-list to recognise traffic based on the requested destination domain. This is handy if you were supporting other API services with similar backend requests but with different domain names. For example WAX Mainnet (wax.eosphere.io) and WAX Testnet (wax-testnet.eosphere.io).
Add the following to the frontend http-in section to cover the access-lists:
acl wax_acl hdr(host) -i wax.eosphere.io

use_backend wax_api_servers if wax_acl { path_beg /v1/chain }
use_backend wax_api_servers if wax_acl { path_beg /v1/node/get_supported_apis }
This example is matching for requests to wax.eosphere.io
As our backend servers don’t support history we haven't forwarded /v1/history .. you are now starting to see the granular control that HAProxy can provide.
backend
This is where the two WAX nodeos servers will be specified and the load balancing algorithm will be configured roundrobin in this case:
backend wax_api_servers
    balance roundrobin
    default-server check maxconn 3000
    server wax-pn-1 <PRIVATE LAN IP>:8888 cookie server1
    server wax-pn-2 <PRIVATE LAN IP>:8888 cookie server2
Prometheus
Enable the Prometheus service with the following additional front end section:
frontend stats
        mode http
        bind <PRIVATE IP>:8404
        http-request use-service prometheus-exporter if { path /metrics }
        stats enable
        stats uri /stats
        stats refresh 10s
Save and Start
Now that that the haproxy.cfg file is successfully configured save and exit.
Check the configuration for errors:
> haproxy -c -V -f /etc/haproxy/haproxy.cfg
Configuration file is valid
Restart the HAProxy Service
> sudo service haproxy restart> sudo service haproxy status
Active: active (running)
The HAProxy server will now accept requests to the statistics dashboard powered by Prometheus where you can observe the operation of your newly built WAX HAProxy Load Balancer.
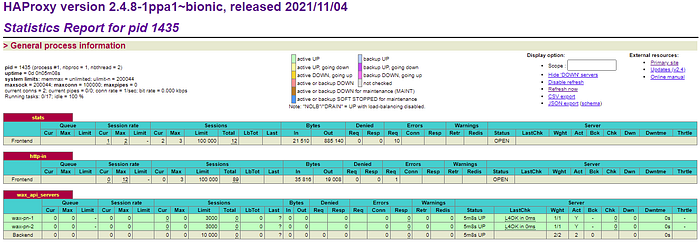
HAProxy Statistics Dashboard
http://<PRIVATE IP>:8404/statsAnd of course test an external request to your WAX nodeos load balanced servers after you have pointed your DNS A record to the configured HAProxy public IP address. NB: As we have an access-list configured to match interesting requests, the test request will have to be made using the DNS name and not an IP address.
https://<Your Company DNS_Name>/v1/chain/get_infoThese WAX Developer Technical Guides are created using source material from the EOSphere WAX Technical How To Series
Be sure to ask any questions in the EOSphere Telegram